Adding Subtitles to Media
It is occasionally necessary to add subtitles to videos. This may be for accessibility reasons or to aid non-native speakers of the language.
What are Subtitle Files?
Generally, subtitles are stored in a separate file from the video. Video systems like Kaltura and Youtube use both a video file and a subtitle file to produce the subtitle experience you are used to.
The two subtitle file formats you are most likely to work with are .srt and .vtt. Both contain the same data (the text to display and the timestamps corresponding to each line of text) in a slightly different format.
Creating Subtitle Files
Although there are numerous options for creating subtitle files, the recommended program is Aegisub (http://www.aegisub.org/).
Using Aegisub
Aegisub’s site contains detailed documentation on its use, but the basic steps are as follows:
In the “Video” menu bar, choose “Open Video…”
Select the video you want to add subtitles to.
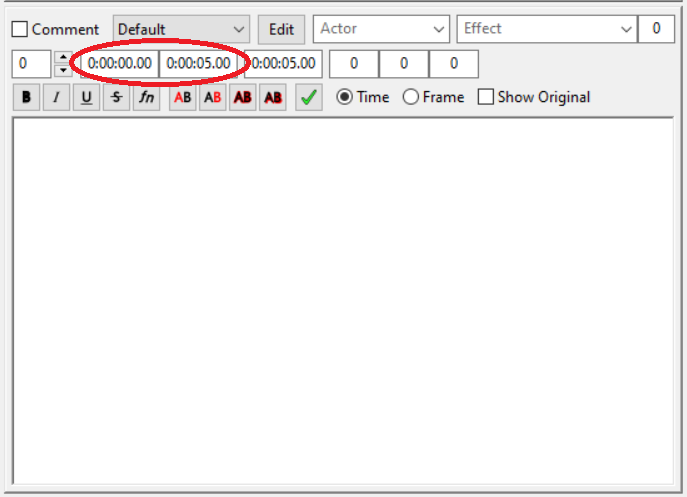
In the subtitle box, set the time that the subtitle should start displaying and the time that it should stop displaying, in the boxes circled below.
In the large text box, enter the text for the subtitle for this timestamp.
Click the green check box button to confirm this subtitle.
Repeat this process for each piece of text to display.
Viewing All Subtitles
As you go, you can see all created subtitles and play the video with them to ensure the timings are correct. The set of created subtitles will appear in a window like the one shown below.

Notes:
Clicking on a subtitle will let you edit it.
CPS stands for characters per second. This is a quick metric to determine if there is too much text for users to read in the time that the subtitle is on the screen. A red box indicates that this may be the case.
Saving Subtitles in Aegisub
When you are done creating and editing your subtitles, you will want to save your subtitles in a useful format.
Go to the “File” menu.
Select “Export Subtitles…” (not “Save Subtitles”).
In the window that pop up, select “Export…”
Choose a file name ending in “.srt” and save.
While you may select “Save Subtitles” as well, this is unnecessary and does not replace the export step.
Adding Subtitles to YouTube
If you want to upload a video to YouTube with subtitles, you may use the .srt file created with Aegisub.
Sign in to the Youtube account you would like to use to upload videos.
Click the circle in the top right and click "YouTube Studio" from the dropdown menu.
A new page will appear.
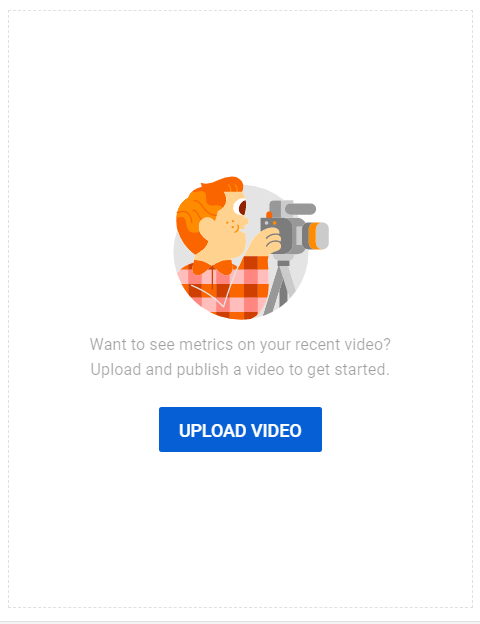
For each video:
Click the "Upload video" button:
Drag the video file from your computer to the window that pops up.
Give the video a title and description.
Select an audience ("No, it's not made for kids")
Click "More options" at the bottom of the window.
For language, select the language of the subtitles.
Right beneath this, click "Upload Subtitles/CC".
Choose "With timing".
Upload the .srt subtitle file corresponding to the video.
Click Next twice.
Select the appropriate Visibility.
Click "Publish".
Adding Subtitles to a Video on CCLE (Kaltura)
You may wish to add subtitles to a video you will be uploading to CCLE. This process is unfortunately more complicated than adding them on YouTube. This is because CCLE requires subtitles to be in a format that Aegisub cannot create - .vtt.
Converting Subtitle Files from .srt to .vtt
We have a Python 3.8 script capable of converting .srt files to the .vtt format. This script is housed in the Humanities Technology Bitbucket and is publicly available at https://bitbucket.org/uclacdh/srt-to-vtt-subtitle-converter/src/master/. Running it requires Python to be installed on your computer and is best done on a Mac, so it is best for a RITC to complete this task.
To run this program:
Put the srt_to_vtt.py file from Bitbucket in the same folder as the .srt file to convert.
Change the line readFile = '0_6q1bx6ol.srt' to contain the name of the .srt file to convert
Run in Python.
The converted file will be in the same folder as the .srt file, with the same name, but with a .vtt extension.
Uploading .vtt Files to CCLE
First, you should upload the video to caption to CCLE.
Turn editing mode on.
Click the orange Add an activity or resource button at the bottom of the page.
Select “Label” from the sidebar on the left. Other activity and resource types are also possible, but label is the easiest.
Click the Add button.
A new window will appear.
In the “Label text” textbox, select the “Insert or edit an audio/video file” button, circled in red below:

A new window will appear, labeled “Insert Media.”
Click the “Video” tab.
Click the Browse repositories… button.
Follow the instructions to upload a file. The upload may take some time.
Once the file is uploaded, click the Select this file button.
You are now ready to add the subtitles.
In the “Insert Media” window, click the words “Subtitles and captions.”
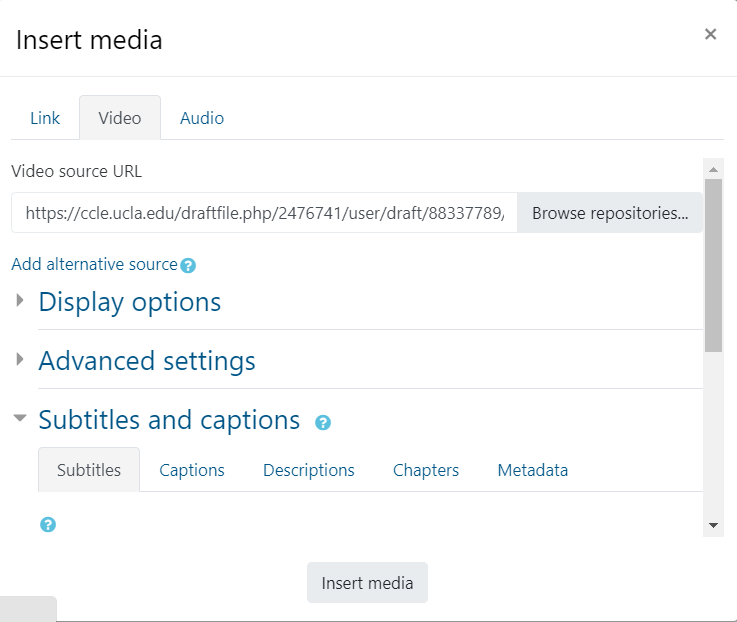
Under “Subtitle track URL,” click the Browse repositories… button.
Upload your .vtt subtitle file.
Select the language of the subtitles.
Check the “Default” checkbox, if you would like these to play by default.
Click Insert media.
Click Save and continue to course.
You can now watch your video on your course site to ensure the subtitles have correctly uploaded.