Using Respondus
Instructors at UCLA have access to Respondus, a lockdown browser that is useful for online assessments. Respondus doesn’t replace an in-person proctor, but does provide a secure interface and a full audio and video recording of the test attempt. We strongly urge you to reach out to your local support unit before using Respondus in your class.
Document Topics
Setting up an assessment to use Respondus
Configuring the assessment to use Respondus
Live proctoring with Respondus (2 Methods)
The student experience
Other training
Setting up an assessment to use Respondus
In order to use Respondus, you first need to have a quiz built and ready to use on your CCLE course site.
If you haven’t used Respondus before, you will need to configure and display the CCLE Block for Respondus LockDown Browser.
Turn editing mode on.
From the Add a Block dropdown menu on the right side of your site, select “Respondus LockDown Browser.” You’ll probably have to scroll down in the list to find it.
Configuring the Assessment to use Respondus
In order to enable Respondus on an existing quiz, follow these steps:
Click on “Dashboard” in the Respondus block, then “Continue to Lockdown Browser.”
A list of quizzes in the course will be displayed. (Note: some browsers have trouble displaying this page. If you see a black screen, try a different browser.
Select Settings from the context menu to the left of the quiz title to bring up the following options screen:
Select “Require Respondus LockDown Browser for this exam” under “Lockdown Browser Settings.” Under “Advanced Settings,” instructors can customize certain features of the lockdown browser:
“Lock students into the browser until exam is completed”: Checking this prevents students from exiting the Lockdown browser until they finish the exam. This option is unchecked by default because students taking exams at home often run into internet connectivity issues that may terminate their exam prematurely. Instructors may choose to enable this option if the students are all taking a quiz on the same, strong internet connection (such as in a computer lab on campus). If it is enabled, instructors have the ability to set a password that students have to enter before exiting the browser early.
“Allow students to take this exam with an iPad”: Students who wish to use an iPad with Respondus will have to download the “LockDown Browser” app from the Apple App store. * PLEASE NOTE *: As of February 2021, CCLE is unable to support this iPad integration.
“Allow access to specific external web domains”: This feature allows instructors to add specific websites that students are able to view while using the Lockdown Browser. This can be useful if there is an online textbook or reference sheet that instructors want their students to have access to. In order to use this feature, instructors must include the allowed link(s) as part of the quiz text, since students are unable to open additional tabs unless they click on a hyperlink.
“Enable Calculator on the toolbar”: Allows students use of a calculator in the Lockdown Browser. Instructors can choose between a standard and scientific calculator.
“Enable Printing from the toolbar”: Allows students to print a page of an exam.
To require all students to use a webcam during the exam, select “Require Respondus Monitor for this exam.” To give students the option to either take the exam with a webcam or in a proctored testing lab, select “Either Respondus Monitor or a proctored lab can be used to take this exam.” A test password will then be required to access the test in proctored settings.
Select the items to be included in the Startup Sequence, which includes the steps a student must complete prior to the start of an exam. The webcam check and facial detection check are mandatory, but all other settings are optional and can be reordered by dragging and dropping them to the desired order.
Click “Save and Close” to apply settings.
Live Proctoring (Using Zoom) with Respondus
Some instructors may wish to monitor their students over Zoom while an exam is happening in addition to using Respondus. There are two ways to proctor assessments using Zoom and Respondus.
METHOD 1
The first and simplest is built into Respondus and allows you to use a variety of teleconferencing tools to live proctor. You simply create a Zoom meeting for students and they will only be able to start the exam once you provide them with a start code.
It's important to note that audio is the biggest concern when using Zoom as a proctoring tool. Students are unable to access the Zoom controls once they enter the lockdown browser, which means that if their audio is on, everyone will hear what is said or played, which is not ideal for listening comprehension or voice recording activities. As the host, you may mute everyone from the onset, but students may not be able to speak to you if they need to. As such, we recommend using this method for smaller classes (<25 students).
To enable:
Click on “Dashboard” in the Respondus block, then “Continue to Lockdown Browser.”
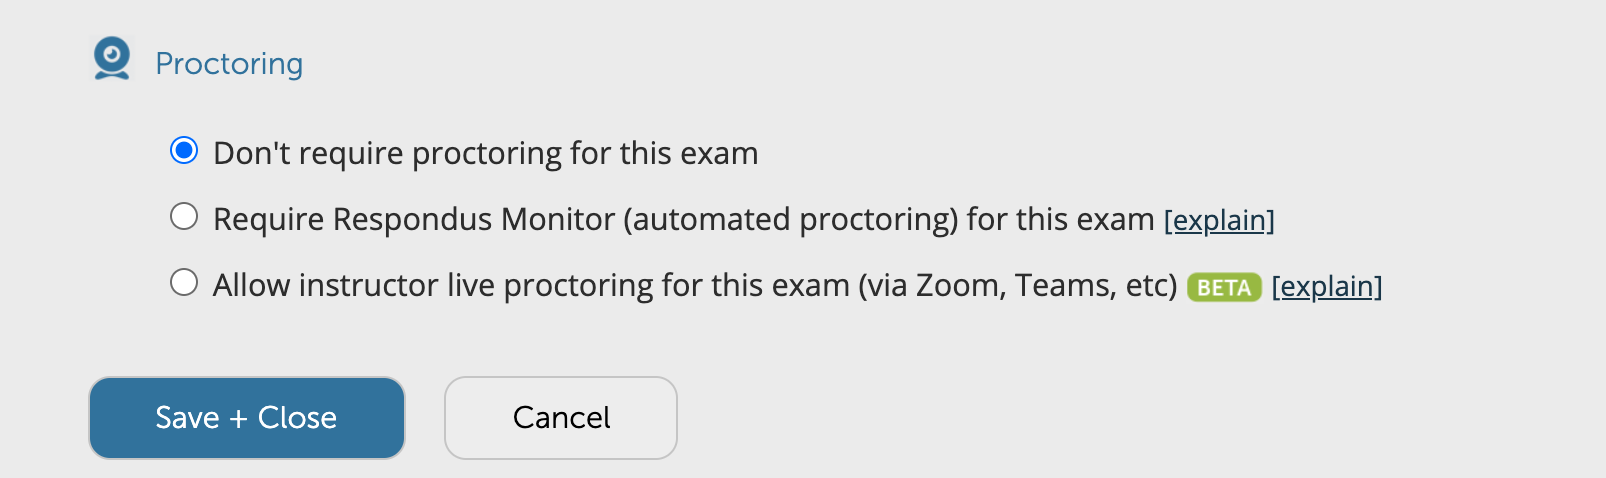
Select Settings from the context menu to the left of the quiz title to bring up the options. Once Require Lockdown Browser has been selected, you will see a Proctoring option. Choose Allow instructor live proctoring for this exam….
Under Select your video conferencing system, select Zoom.
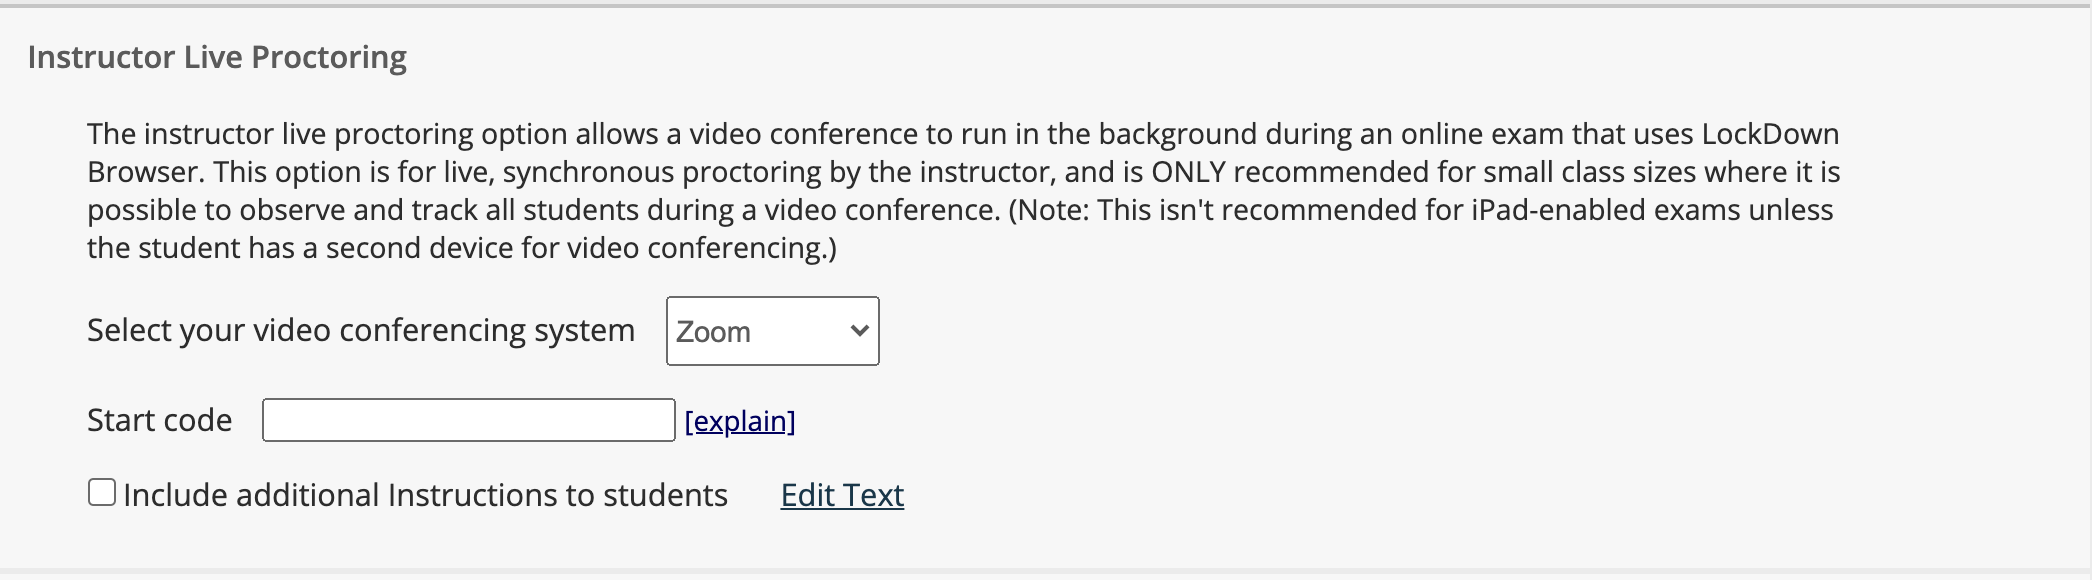
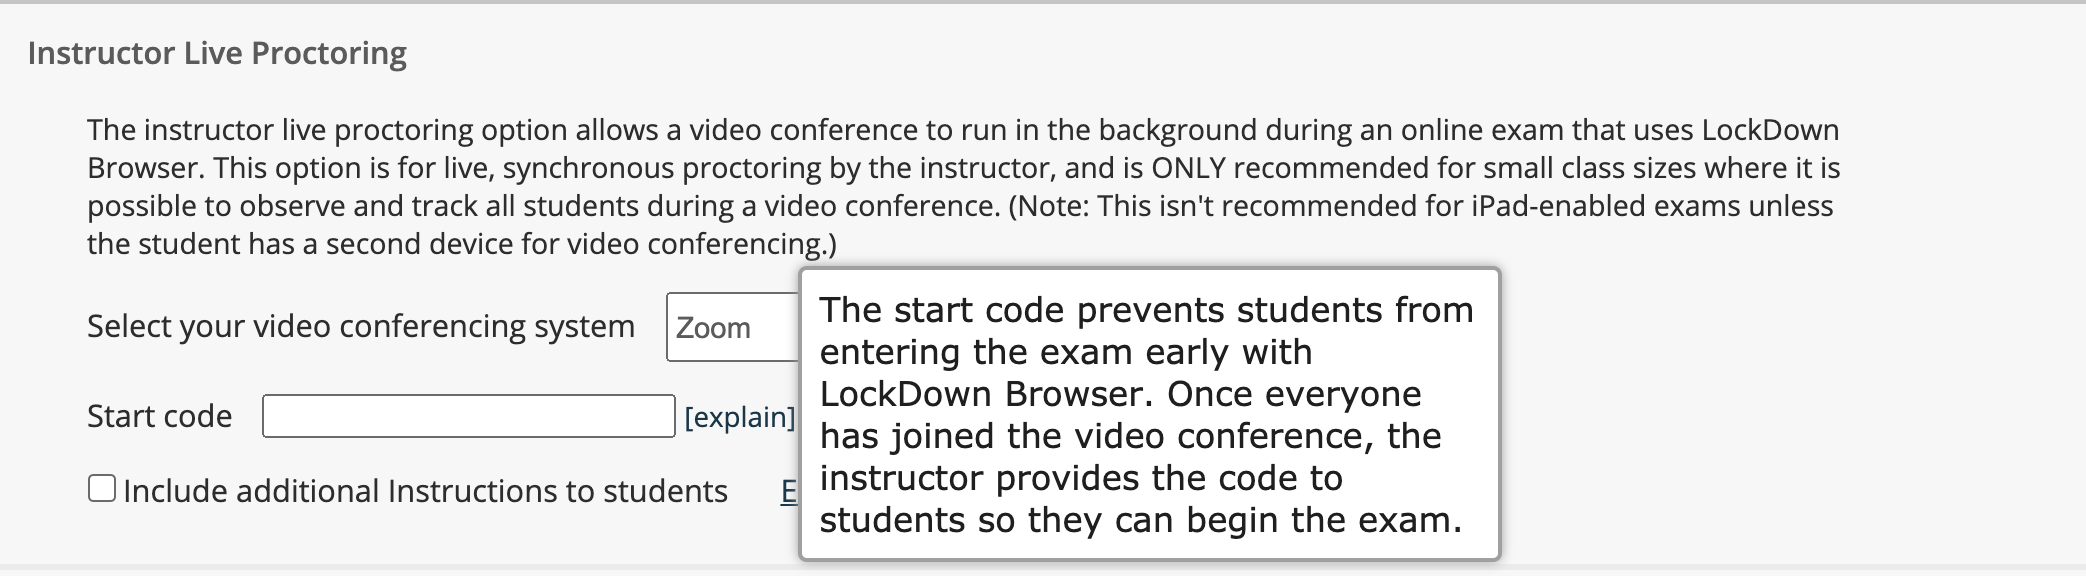
Set a Start code for the exam.
Then, distribute the Zoom meeting information to your class, and the start code once everyone is in the meeting.
METHOD 2
The alternative way is to allow the use of an external URL in the Respondus settings.
In this method, students are not able to use their desktop version of Zoom while in the LockDown Browser, nor can they open new tabs in the browser, so instructors will have to take a few steps when configuring Respondus for a given exam in order for this to work. This does, however, preserve their access to the sound controls in Zoom.
In “Advanced Settings” for “LockDown Browser Settings,” check the option “Allow access to specific external web domains” (see above for instructions on how to access these settings).
In the box that appears, enter “ucla.zoom.us” or, if the Zoom meeting you will be using for proctoring is for some reason not created from a UCLA-affiliated zoom account, “zoom.us.”
Click the blue “Save and close” button at the bottom of the advanced settings.
Create a meeting in Zoom that you will be using to proctor the exam. Include the link to this meeting at the beginning of the quiz. This is the only way students will be able to access Zoom once they enter the LockDown Browser.
Instruct students to click on this link once they have gone through the initial startup sequence. This will open the Zoom meeting in a different tab. However, students will need to join the meeting from the browser instead of from their desktop Zoom app, which is mostly likely how they are familiar with joining a Zoom meeting. In order to do this, they will need to disallow the browser from opening the Zoom app (by clicking “Cancel” in the pop up window) and clicking on “join from your browser.”
Once they have entered a name for the meeting, the student will be in the proctoring Zoom meeting and can navigate back to the other tab to take the exam.
The Student Experience
Students need to download and install the LockDown Browser, and they need to ensure their computer is configured properly to successfully take the test
Installing the LockDown Browser
Respondus LockDown Browser can be downloaded at the following link: http://www.respondus.com/lockdown/download.php?id=228644488.
It is important that you use this link, as it is UCLA specific. Simply start the LockDown Browser installation program and follow the onscreen instructions to complete the install.
Note: Sometimes, after clicking the update icon to install new updates, an error code will show up. In those cases, you’ll have to reinstall Respondus from scratch with the download link.
How Students take the Assessment
Navigate to the test in CCLE using a normal web browser (Chrome, Firefox, Safari, etc.). * NOTE: Older versions of Respondus asked students to start the exam in the LockDown browser. This is no longer the case for Moodle/CCLE. *
Click the link to download LockDown Browser if you haven’t already done so. Once the software is installed. Click the “Launch LockDown Browser” button.
After LockDown Browser opens, choose Connect to CCLE Shared System.
If prompted to close a blocked program (e.g. screen capture, instant messaging), choose “Yes” or “kill application” when prompted. Or, close LockDown Browser and then close the blocked program before restarting.
If the student is required to use a webcam to record themselves during the test, a Startup Sequence will guide the student through a webcam check and other items required by the instructor.
Once a quiz has been started with LockDown Browser, you cannot exit until the Submit all and finish button is clicked.
* TIP – Prior to the first assessment, have students complete a practice assessment that uses LockDown Browser to make sure they have installed it correctly. *
What if a Standard Browser is Used?
If the settings for a quiz require that LockDown Browser be used, it cannot be taken with a standard browser. In fact, you can easily confirm that a quiz has been properly set for LockDown Browser by following these steps using a regular browser.
Open a regular web browser such as Internet Explorer or Safari.
Login to the CCLE course as a student.
Navigate to the quiz and open it. As shown below, a warning message will indicate that LockDown Browser is required for the quiz. Students will have to click “Launch LockDown Browser“ before they can take the quiz.
Reviewing Webcam Videos
If students were required to use the webcam feature (Respondus Monitor) with the exam, instructors can access information about the exam sessions and can review the recorded videos. Note that Respondus Monitor is intended to be a deterrent, so it’s up to the instructor to determine the level of review warranted.
To review student videos:
Return to the Respondus LockDown Browser Dashboard in the CCLE course (see instructions above).
From the context menu to the left of the test title (the down arrow button), select “Class results”.
A roster of the students in the course is shown, along with the date, time, duration of the test, and grade (if applicable).
Click [ + ] to expand the section for a student.
Details of the startup sequence and the exam session are shown in thumbnails. Click a thumbnail to view the video from the time indicated. Videos can be marked as reviewed, flagged or have comments added by the instructor.
Note that viewing the videos requires Adobe Flash to be active. If you are prompted to enable it, you may need to repeat the above steps to get back to the video after doing so.
Note: If you are having students record themselves (using PoodLL) as part of a quiz, and you are requiring them to use the Respondus Lockdown browser, instructors will need to review their submissions using the Google Chrome browser.
Using a non-US keyboard
If you need to have students use a non-US keyboard, Respondus allows this by having the students pre-set their keyboard choices. See: http://support.respondus.com/kbimages/support/using-multiple-language-keyboards-with-lockdown-browser.pdf
Students can also type specific characters (such as for French or Spanish online exams) while in the Respondus Lockdown Browser by selecting the icon showing a sheet of paper with an “A” on it, located in the upper left hand corner of the Browser.
Other Training and Support
If you have questions or would like some hands on training, please contact us at Humanities Technology either in person (1020 Public Affairs), over email (ritc@humnet.ucla.edu), or at our Zoom support channel (ucla.zoom.us/j/865893942). Hours vary over the year and can be found on the Humtech website.
Further Documentation
Respondus Lockdown Browser: https://web.respondus.com/he/lockdownbrowser/
Moodle - Safe Exam Browser: https://docs.moodle.org/38/en/Safe_exam_browser